

Debian 12 VPS ruTORRENT Installation and Configuration
Hello friends, in this setup we will install and configure a seedbox ruTorrent with 1 CPU and 2 GB RAM. This will give us our own seedbox. Let's get started. I assume you are connecting via SSH to a Linux Debian 12 VPS. If you complete the installation steps correctly, you will be successful.
Step 1: Updating the System and Installing
Necessary Packages First, let's update our server and install the software we will need:
" apt update && apt upgrade -y "
" apt install rtorrent nginx php-fpm php-cli php-xml php-curl php-xmlrpc php-mbstring php-zip unrar unzip ffmpeg mediainfo curl screen git apache2-utils -y "
If you receive the command enclosed in quotation marks after issuing the second command above, "E: Package 'unrar' has no installation candidate," then here's what you need to do.
Option 1: Using unrar-free (The Fastest and Easiest Way)
You can install the open-source alternative package unrar-free. It will more than suffice for most archive files. You can successfully complete the installation by replacing the 'unrar' part in your command with 'unrar-free':
" apt install rtorrent nginx php-fpm php-cli php-xml php-curl php-xmlrpc php-mbstring php-zip unrar-free unzip ffmpeg mediainfo curl screen git apache2-utils -y "
Option 2: Adding the non-free repository for the original unrar (Recommended)
If you are setting up an rTorrent/ruTorrent-based seedbox, it may be healthier to install the original unrar package to avoid problems with newer generation (RAR5) encrypted or fragmented archives. To do this, you need to add the non-free component to your system's repository list: Step 1: Activate the non-free repositories by editing the repository list. You can do this automatically with the following command:
" sed -i 's/main/main contrib non-free non-free-firmware/g' /etc/apt/sources.list "
(Note: If your Debian 12 (Bookworm) system uses the new format /etc/apt/sources.list.d/debian.sources, you may need to open this file with a text editor (e.g., nano) and add "non-free" to the Components: line.) Step 2: Update the package list:
" apt update "
Run the original command you wrote first again:
apt install rtorrent nginx php-fpm php-cli php-xml php-curl php-xmlrpc php-mbstring php-zip unrar unzip ffmpeg mediainfo curl screen git apache2-utils -y
Extra Tip: You received the following warning in the output of the first `apt upgrade` command you ran: "The following package was automatically installed and is no longer required: linux-image-6.1.0-48-amd64" This means you have an old Linux kernel left on your system that is no longer used. After completing your installation, you can safely delete this unnecessary package using the following command to save disk space:
" apt autoremove -y "
" apt install rtorrent nginx php-fpm php-cli php-xml php-curl php-xmlrpc php-mbstring php-zip unrar unzip ffmpeg mediainfo curl screen git apache2-utils -y "
Now, in the terminal window, type the command above and press Enter.
Step 2: Torrent Configuration
Let's create the folders where the torrent will store the downloaded files and session information
" mkdir -p ~/rtorrent/{downloads,session,watch} "
Now let's create the rTorrent configuration file (.rtorrent.rc):
" nano ~/.rtorrent.rc "
Paste the following configuration into the blank screen that opens (you can paste it using CTRL+SHIFT+V or by right-clicking):
"
directory.default.set = ~/rtorrent/downloads
session.path.set = ~/rtorrent/session
network.port_range.set = 50000-50000
network.scgi.open_port = 127.0.0.1:5000
encoding.add = UTF-8
"
To save and exit, press CTRL+O -> Enter -> CTRL+X in sequence.
Step 3: ruTorrent (Web Interface) Setup
We will pull the ruTorrent files from GitHub and place them in the web server's publishing directory
"
rm -rf /var/www/html/*
git clone https://github.com/Novik/ruTorrent.git /var/www/html/rutorrent
"
Let's grant the web server the necessary permissions to access these files:
"
chown -R www-data:www-data /var/www/html/rutorrent
chmod -R 775 /var/www/html/rutorrent
"
Step 4: Setting a Password for Security
We don't want your interface to be publicly accessible. Let's set a username and password for ruTorrent login. In the command below, replace "your username" with your own
"
htpasswd -c /etc/nginx/.htpasswd user1
"
I set the username as "user1". When you type the command ssh and press enter, New password: Re-type new password: Enter your password and make sure it's one you won't forget. Press enter.
Step 5: Nginx Web Server Configuration
Let's create the Nginx configuration file for ruTorrent.
"
nano /etc/nginx/sites-available/rutorrent
"
"
server {
listen 80;
server_name "your vps ip adres";
root /var/www/html/rutorrent;
index index.html index.php;
auth_basic "Restricted Access";
auth_basic_user_file /etc/nginx/.htpasswd;
location / {
try_files $uri $uri/ =404;
}
location ~ \.php$ {
include snippets/fastcgi-php.conf;
fastcgi_pass unix:/run/php/php8.2-fpm.sock;
}
location /RPC2 {
include scgi_params;
scgi_pass 127.0.0.1:5000;
}
}
"
Save and exit (CTRL+O, Enter, CTRL+X).
Now let's activate this setting, delete the default setting, and restart Nginx.
"
ln -s /etc/nginx/sites-available/rutorrent /etc/nginx/sites-enabled/
rm /etc/nginx/sites-enabled/default
systemctl restart nginx
systemctl restart php8.2-fpm
"
Step 6: Starting rTorrent
We will use the `screen` command to keep rTorrent running continuously in the background. Run the following command
"
screen -dmS rtorrent rtorrent
"
(Note: Restarting your server will close rTorrent. To reopen it, you need to connect via SSH and enter the screen command above again.)
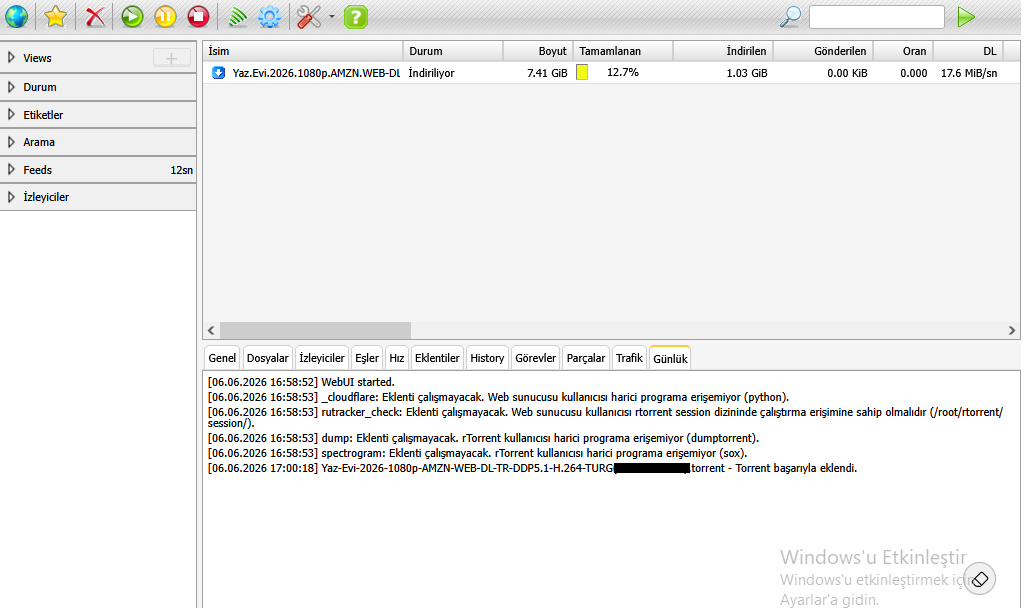
Installation Complete! 🎉
Now you can open your browser and enter the following address in the address bar:
http://vps_ip_adress
A login window will appear. You can access the rTorrent interface by entering the username and password you specified in Step 4. Your files will be downloaded to the ~/rtorrent/downloads folder on the server.
Installation is complete, folks! You now have a rock-solid rutorrent and can use it. If you encounter any problems, you can leave a comment below.

